Persisting SQL Server Data in Docker Containers – Part 1
What’s the number one thing a data professional wants to do with their data…keep it around. Let’s talk about running SQL Server in Containers using Docker Volumes on a Mac
This is the first post in a three part series on Persisting SQL Server Data in Docker Containers. The second post on where Docker actually stores your data is here. And the third post on mapping base OS directories directly into containers is here.
The Need for Data Persistency in Containers
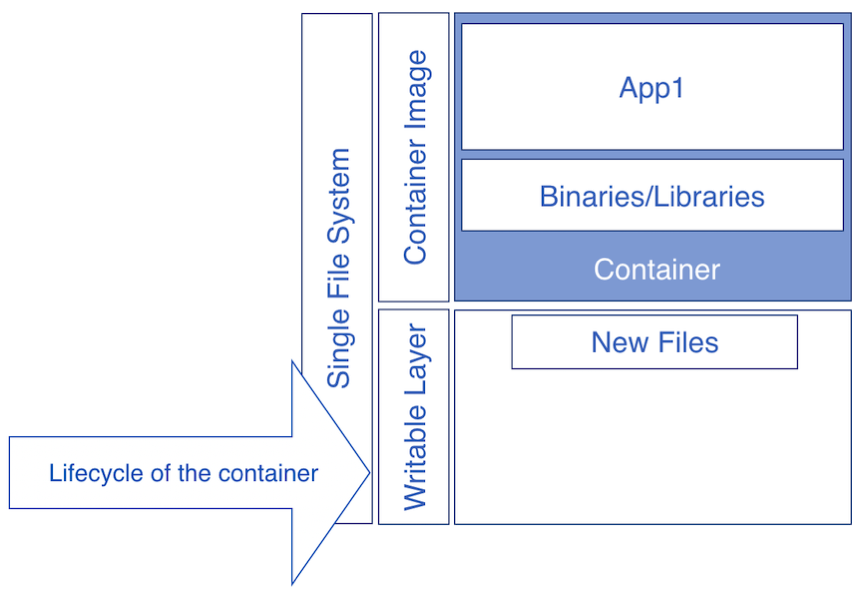
A container image is read-only. When an application changes data inside a running container writes are written to a writable layer. The writable layer plus the read-only container image are brought together by the container runtime and presenting to the processes running inside the container as a single file system.
The primary issue with this is that the writeable layer has the lifecycle of the container. If you delete the container, you delete the writeable layer and any data that was in there. Luckily Docker containers give us a way to decouple the container and its data.
In Figure 1, you can see a container image and it’s writeable layer. The application inside the container sees this has a single file system. If we delete this container, any data written to the writeable layer will be deleted too.

Figure 1: A container and it’s writable layer
Docker Volumes
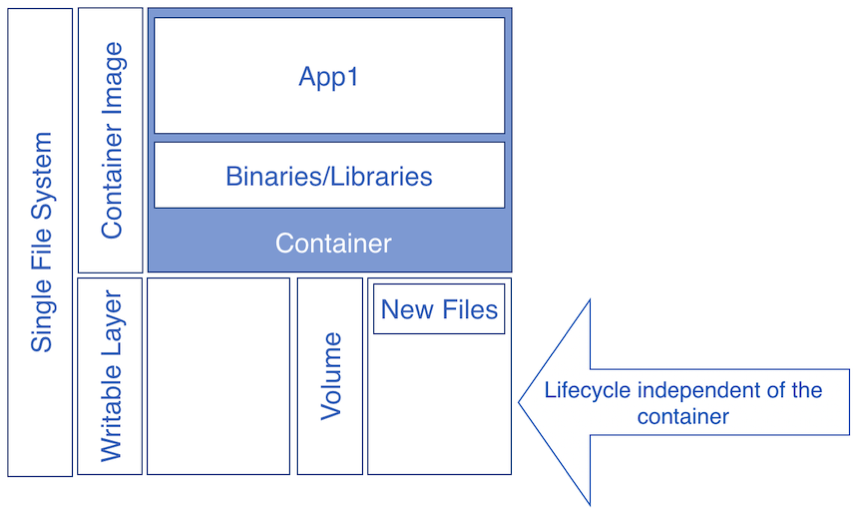
A Docker Volume is a Docker managed resource that is mapped into a defined point in the filesystem inside the container. The primary benefit of using Docker Volumes is that they have a lifecycle that’s independent of a container. This enables you to decouple your application from its state to the point where you can simply throw away the container and replace it with a new container image start up your application and point it to your data.
In Figure 2, we have a container, a writeable layer and a volume. A container will always have a writeable layer even when a Volume is defined. A Volume will be mounted at a specific location in the file system inside the container and writes to that location will be written to the Volume. Writes to other parts of the file system will be written to the writable layer.

Figure 2: A container, it’s writable layer and a Volume
SQL Server using Docker Volumes
Let’s talk about how we can use Docker Volumes and SQL Server to persist data. If we want to run SQL Server in a container we will want to decouple our data from the container itself. Doing so will enable us to delete the container, replace it and start up a new one pointing at our existing data. When running SQL Server in a container will store data in /var/opt/mssql by default. When the container starts up for the first time it will put the system databases in that location and any user databases created will also be placed at this location by default.
Now, if we don’t use a Volume that data will be written into the writeable layer of the container and if we delete the container…we delete our data. We don’t want that so let’s start up a container with a Volume. To do so we use the -v option when we use the docker run command.
docker run \
--name 'sql17' \
-e 'ACCEPT_EULA=Y' -e 'MSSQL_SA_PASSWORD='$PASSWORD \
-p 1433:1433 \    -v sqldata1:/var/opt/mssql \
-d mcr.microsoft.com/mssql/server:2017-latest
In the code above you can see –v sqldata1:/var/opt/mssql specified as part of the docker run command. This creates a Docker Volume sqldata1 and maps that inside the container to /var/opt/mssql. Now during this container’s start up when SQL Server will write its data to /var/opt/mssql which is actually going to be written to the Volume. If we delete this container and replace it…when SQL Server starts up it will see the master database and proceed initializing the system as defined in master. If there are any user databases defined in master and they’re accessible they will be brought online too. Let’s try it out…first up let’s create a user database and query the file information about the databases in this container.
sqlcmd -S localhost,1433 -U sa -Q 'CREATE DATABASE TestDB1' -P $PASSWORD

sqlcmd -S localhost,1433 -U sa -Q 'SELECT name, physical_name from sys.master_files' -P $PASSWORD -W
name physical_name
---- -------------
master /var/opt/mssql/data/master.mdf
mastlog /var/opt/mssql/data/mastlog.ldf
tempdev /var/opt/mssql/data/tempdb.mdf
templog /var/opt/mssql/data/templog.ldf
modeldev /var/opt/mssql/data/model.mdf
modellog /var/opt/mssql/data/modellog.ldf
MSDBData /var/opt/mssql/data/MSDBData.mdf
MSDBLog /var/opt/mssql/data/MSDBLog.ldf
TestDB1 /var/opt/mssql/data/TestDB1.mdf
TestDB1_log /var/opt/mssql/data/TestDB1_log.ldf
In the code above we create a database, when query master for the information about the databases running inside this container. You can see all of the paths are /var/opt/mssql which is our volume.
Container and Data Independence
The Docker Volume created with the -v option created a Docker managed Volume that is independent of the container so our data will live in there and we can service the container independent of the volume. So let’s do that…let’s delete the container and start up a new container and let’s go so far as to use a 2019 container to upgrade SQL Server…that’s cool!
docker stop sql17
docker rm sql17
The code above will stop and then delete the container. When the container is deleted, so is its writeable layer. But we are storing out data in the Volume and that still exists.
docker volume ls

DRIVER              VOLUME NAME
local               sqldata1
Above we can see there is a Volume using the local driver and its name is sqldata1…this still exists and can be mounted by new containers. The local drive is used to map directories from the base OS inside the container. There are other types of drivers that expose other types of storage into the container. More on this later.
docker run \
--name 'sql19' \
-e 'ACCEPT_EULA=Y' -e 'MSSQL_SA_PASSWORD='$PASSWORD \
-p 1433:1433 \
-v sqldata1:/var/opt/mssql \
-d mcr.microsoft.com/mssql/server:2019-latest
With this code, we start up a new container and tell it to use the same Volume and mount it into /var/opt/mssql. So when SQL Server starts it finds the master database, master has the metadata about any configuration and user databases and we get back into the state we were previously in. Let’s ask SQL Server for a list of databases.
sqlcmd -S localhost,1433 -U sa -Q 'SELECT name, physical_name from sys.master_files' -P $PASSWORD -W
name physical_name
---- -------------
master /var/opt/mssql/data/master.mdf
mastlog /var/opt/mssql/data/mastlog.ldf
tempdev /var/opt/mssql/data/tempdb.mdf
templog /var/opt/mssql/data/templog.ldf
modeldev /var/opt/mssql/data/model.mdf
modellog /var/opt/mssql/data/modellog.ldf
MSDBData /var/opt/mssql/data/MSDBData.mdf
MSDBLog /var/opt/mssql/data/MSDBLog.ldf
TestDB1 /var/opt/mssql/data/TestDB1.mdf
TestDB1_log /var/opt/mssql/data/TestDB1_log.ldf
…and there you can see in the output above, SQL Server is in the state it was in the initial running of the container on the 2017 image. Now we’re on the 2019 image and have access to all of our persisted data independent of the container image.
sqlcmd -S localhost,1433 -U sa -Q 'SELECT @@VERSION' -P $PASSWORD
-----------------------------------------------------------------
Microsoft SQL Server 2019 (RC1) - 15.0.1900.25 (X64) Aug 16 2019 14:20:53
Copyright (C) 2019 Microsoft Corporation Developer Edition (64-bit) on Linux (Ubuntu 16.04.6 LTS)
Containers have replaced virtual machines for me and the decoupling of data and computation will have a significant impact on how we design data platforms and systems going forward. In this post, I wanted to highlight how you can use a container with persistent state systems like SQL Server. In the next post, I’m going to show you where that data actually lives on the underlying Operating System.
